Deploy NodeJs app - Part 3 - Optimizing Docker image

Dockerization is a powerful concept that makes the deployment process easier nowadays. However, when not carefully implemented, Dockerfile could produce a large image size and time-consuming build process.
In this article, we'll cover how to optimize the docker image.
Note that this article is part of Deploy NodeJs app series about deploying application to the cloud:
We will use three steps to make our Dockerfile optimized:
- Use lightweight base image
- Use multi-stage Dockerfile
- Investigate image layers for further optimization
Initial Application
We'll start from an initial NestJs application. You can find it here. The complete solution is there.
Let's take a look at an initial Docker file.
FROM node:16

WORKDIR /usr/src/app

COPY package.json yarn.lock ./

RUN yarn

COPY . .

EXPOSE 3000

CMD [ "yarn", "start" ]
The built image should produce the following result:
$ docker build . -t nestjs-api

$ docker images

REPOSITORY  ... IMAGE ID       SIZE
nestjs-api  ... 150a5278252f   1.43GB
It is surprising to get 1.43 GB of image size for NestJs starter app. Isn't it?
1. Use a lightweight base image.
Notice the first Dockerfile line:
FROM node:16
We have used a base image named node:16. This image is a Full Image of Debian. It is suitable for general use. It would be a top choice when you are not sure what to chose yet.
However, there are a lot more images that we can choose from. The smallest one is alpine. And this will be our choice.
Let's compare other base docker images. For purposes of this comparison, we've produced them with Dockerfile containing only the first layer FROM with a specific image name. So pure base image sizes looks like this:
node:16-alpine          112 MB
node:16-slim            176 MB
node:16                 907 MB
node:16-stretch         938 MB
As we see, alpine is the smallest one. Let's update the first layer of our Dockerfile:
FROM node:16-alpine
As a result, we should get this image size:
REPOSITORY  ... IMAGE ID       SIZE
nestjs-api  ... 27a93957eb10   632MB
Not bad, not bad, we cut the output image by half. Would we cut more? Obviously!
2. Use multi-stage builds
The goal of this step is to get rid of all devDependencies from the final image. In production, we don't need any of them. But at the build time, we do. So how to deal with both needs?
With multi-stage builds, you use multiple FROM statements in your Dockerfile. Each FROM instruction can use a different base, and each of them begins a new stage of the build. You can selectively copy artifacts from one stage to another, leaving behind everything you don’t want in the final image.
The idea of our optimization is simply:
- first stage: build an application
- second stage: copy production build from the previous stage without devDepencencies to the final image
Let's check it out:
FROM node:16-alpine AS build-image WORKDIR /usr/src/app COPY package.json yarn.lock ./ RUN yarn COPY . . RUN yarn build FROM node:16-alpine AS final-image WORKDIR /usr/src/app COPY package.json yarn.lock ./ RUN yarn --production COPY /usr/src/app/dist ./dist EXPOSE 3000 CMD ["node", "dist/main"]
Let's break it down:
FROM node:16-alpine AS build-stage
Each stage starts from a FROM keyword. Each stage will create a build stage that we can reuse later. Note that we have a new keyword AS. We will use it to give a name to a specific stage. Later on, we can use it as a reference. It's up to us how we name it.
WORKDIR /usr/src/app

COPY package.json yarn.lock ./

RUN yarn

COPY . .
The following four lines are just the same as before.
RUN yarn build
Previously we just run a CMD yarn start. It has triggered a build automatically behind and starts the app. This time, we need to generate a build only.
Time to the second stage.
FROM node:16-alpine AS final-stage
We will use just the same base image, but this time, we will name it differently.
WORKDIR /usr/src/app

COPY package.json yarn.lock ./
Then we set folder and copying packages like in the previous stage.
RUN yarn --production
And here comes our optimization. We don't want to install any devDependencies. So we have to set the production flag to production
COPY /usr/src/app/dist ./dist
We will use the output from the previous stage. As you can notice, we have used a --from parameter. It indicates from which image we will copy.
EXPOSE 3000

CMD ["node", "dist/main"]
We are exposing port like before, and because this is the last stage, we run an app direct from the dist folder containing our build.
Let's see the result:
REPOSITORY  ... IMAGE ID       SIZE
nestjs-api  ... de9a036cc871   392MB
It seems that we get rid of hundreds of MB. But in comparison to pure alpine base image (112 MB), it looks like an app build takes about 250 MB? Can we do something with this? Sure.
3. Investigate image layers
Docker history
We can use docker history command line to check the sizes of specific layers.
$ docker history nestjs-api

IMAGE        CREATED BY                      ... SIZE
15d3d9fbf9eb CMD ["node" "dist/main"]        ... 0B
<missing>    EXPOSE map[3000/tcp:{}]         ... 0B
<missing>    COPY /usr/src/app/dist ./dist   ... 60.4kB
<missing>    RUN /bin/sh -c yarn --production... 279MB
<missing>    COPY package.json yarn.lock ./  ... 256kB
<missing>    WORKDIR /usr/src/app            ... 0B
<missing>    /bin/sh -c #(nop)  CMD ["node"] ... 0B
<missing>    /bin/sh -c #(nop)  ENTRYPOINT ["... 0B
<missing>    /bin/sh -c #(nop) COPY file:2387... 116B
<missing>    /bin/sh -c apk add --no-cache --... 7.77MB
<missing>    /bin/sh -c #(nop)  ENV YARN_VERS... 0B
<missing>    /bin/sh -c addgroup -g 1000 node... 98.5MB
<missing>    /bin/sh -c #(nop)  ENV NODE_VERS... 0B
<missing>    /bin/sh -c #(nop)  CMD ["/bin/sh... 0B
<missing>    /bin/sh -c #(nop) ADD file:8ec69... 5.61MB
Notice the size at line:
<missing> RUN /bin/sh -c yarn --production... 279MB
We can expect that production build should take far less space.
Time to deep dive.
Dive tool
A tool for exploring a docker image, layer contents, and discovering ways to shrink the size of your Docker image.
Install Dive.
brew install dive
Explore Docker image with dive.
dive nestjs-api
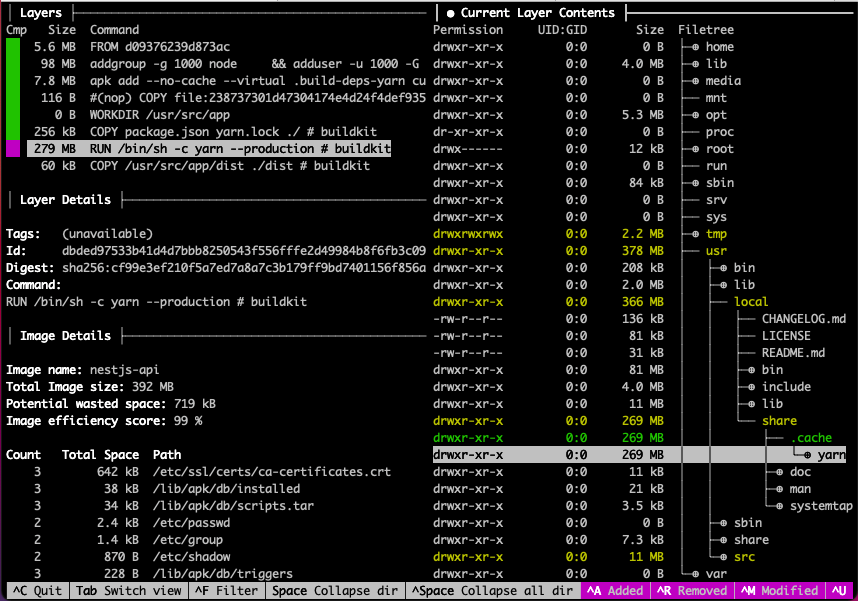
As the result you should see following:

This tool allows us to analyze file structure deeply. O the left-hand side, we have Docker Layers and the size they occupy on the disk. We can select a layer by arrows.
On the right-hand side, we can see details of the file structure that the selected layer affected.
Finally, we have discovered that yarn has created a cache when installing dependencies.
Rearrange stages
To get rid of yarn cache, we can rearrange Dockerfile into this:
FROM node:16-alpine AS initial-stage WORKDIR /usr/src/app COPY package.json yarn.lock ./ FROM initial-stage AS build-stage RUN yarn COPY . . RUN yarn build FROM initial-stage AS production-stage RUN yarn --production FROM initial-stage AS final-stage COPY /usr/src/app/node_modules ./node_modules COPY /usr/src/app/dist ./dist EXPOSE 3000 CMD ["node", "dist/main"]
In the file above, we have four stages now. Let's take a closer look at each of them.
Stage 1. initial
FROM node:16-alpine AS initial-stage WORKDIR /usr/src/app COPY package.json yarn.lock ./
In the first stage, we will create a initial-stage build. We will use it for all following three.
Stage 2. build
FROM initial-stage AS build-stage

RUN yarn

COPY . .

RUN yarn build
In the second one, build-stage, we will make install dependencies and build our app. Notice that we are reusing a stage build from the previous stage.
Stage 3. production
FROM initial-stage AS production-stage

RUN yarn --production
The third one, we need only to install production dependencies. Yarn will also create an internal cache.
Stage 4. final
FROM initial-stage AS final-stage COPY /usr/src/app/node_modules ./node_modules COPY /usr/src/app/dist ./dist EXPOSE 3000 CMD ["node", "dist/main"]
The final-stage is also based on initial-stage. In this stage, we will do nothing heavy but two things
- copy node-modules from production-stage
- copy build files from build-stage.
Notice that we won't copy a yarn cache file, so in that way, we will get rid of it.
Let's see the results:
REPOSITORY  ... IMAGE ID       SIZE
nestjs-api  ... 61de4c904e57   123MB
Sum up
Finally, we have decreased the initial docker image from 1.43 GB to 123 MB in three steps.
Steps                       Image size   Decrease by

initial image               1.43 GB

1. use alpine base image     632 MB      798 MB  (55 %)
2. remove devDepencencies    392 MB      240 MB  (17 %)
3. remove yarn cache         123 MB      269 MB  (19 %)

Total                                    1.3GB   (91 %)
So in total, we have decreased the initial image by 1.3GB (91%).
Quite an impressive result. Isn't it?
Thanks for reading.